1. There’s a religion called Sufism where everybody is looking for someone called “The Friend”. The Friend is subjective but the ideal is to be worthy of them in the objective world. To say it’s pretty hard is an understatement because well, you live here too and you know how it is, some people are just psychos who live off other peoples good will. It’s hard to turn the other cheek if you know they’re a vampire see, but The Friend isn’t cynical. The parallel between The Friend and Jesus is so similar that it’s hard to tell them apart except maybe by name or birthright. The official solution in both cases is that perfection is just someone’s opinion and a friend would overlook any embarrassment. So we should forgive them and pretend they didn't try to scam us to destitution. With aboulutely no cynicism I can tell you that's not going to happen.
Copyright Scott Adams, Inc./Distributed by Universal Uclick for UFSIn that regard I’d still say Jesus is a pretty good idea, He sells well as make believe something to look for in the physical world. It's the organization that promotes Him that has pretty much lost the thread; becoming giant bureaucracies supporting charismatic social climbers that ascribe superfluous bullshit to scare, impress, and scam the natives all to support political ideologies that usher in the end times. It’s a sham but actually, I don’t care so long as they don’t impact me personally.
2. Tibetan buddhism is built around an earlier shamanic religion called Bon and maintains some of its practices. For example they make pretend people called Tulpas, that can act independently as company, helpers, lookouts, lovers, or whatever. Other people can meet them and interact without knowing they’re imaginary. (You & me are totally real though for sure) (because I said).
3. There are other species of make believe critters, like all the various cryptids. But both of the above mentioned (1 & 2) come from approximately the same area (South central Asia), have similar traits and uses, and could maybe have survived as rumors for thousands of years just because it sounds interesting, or maybe not. Maybe Jesus was a Tulpa with a good agent.
4. Some Native American shamans say there are beings called Allies that are associated with psychotropic plants. My own experience with Jimson weed didn’t go very far, but I sort of saw where it can go. It completely silences the internal dialog. Absolutely nothing, you can try to babble but it feels false and unnecessary, and is actually a relief to be free of it. So you cast around for something to fill the void. One of the things that comes up is movement and actions going on around you. You relate to whatever it is through previous social experiences and if it’s capable of relating back (or even if it isn’t), your social experience determines the trip. Casteneda says there are a number of other ways to relate there such as dancing & singing. It really helps to stay away from territorial anima. If you’re somehow compromised and they latch onto you, it could be scary or even fatal, if you believe Castaneda. There are said to be ways to control them but I didn’t like Datura much except for the suppression of brain babble, but that was great. My experience was that I chose to be uninvolved because I knew I could be sucked in, and I didn’t have a framework or a teacher. I did seriously look but was apparently not the right material.
Since there are other ways to find a friend, those should probably be researched first. Of these, Jesus looks easiest and has the widest appeal, recognition and support. But (to me) Tulpas have the most credability because they are probably the basis of the Jesus story.
Sunday, March 13, 2022
Friends


Saturday, February 12, 2022
DIY Elevator
Three similar designs are used here. One indooor stair-lift, one indoor vertical elevator (one person, or 2 if you're chummy), and one outdoor stair-lift.
Winches
These winches are from Amazon. They're Chinese, inexpensive ($120), and noisy. Mine have worked well except for some avoidable problems inherent with this use. There are lots of brands and designs. Each seems to have it's own wiring peculiarities. Some fancy push button wiring is included below for the 2 used here, but the control box that comes with it already works and it doesn't really need those bells & whistles. They were added because the handheld switch cable can be in the way and prone to tangle on the stairs. The lift shown here has plenty of room behind the guide rails but indoor stairs might not be the same.The outdoor winch shown here ---> has a wood block attached to the upper limiting switch. It was supposed to keep the cable from slipping off the spool but the cable sometimes rubbed against it when pulling and would activate the limiting switch to stop the lift. A better solution is Erifs awareness of the possibility of slack so she now watches for it and guides it back on with a glove. Doing that's a bother so she just doesn't let it accumulate slack
Important: Attach the winch cable to the centerline of the chair as low as possible where there's least pressure to tip the chair. With the rails and rollers it won't tip, but unnecessary higher tipping force could cause unplanned wear someplace else. The chair I made for the indoor lift had a higher attachment point and it sometimes chattered till I put an extra roller to press on the brake pipe.
Guide Rails
Above is a vertical elevator using 1/2 inch water pipe for rails. The winch cable shown on the left shows a pulley that halves the power and double the speed. it's not necessary, goes fast enough and doesn't need complication.
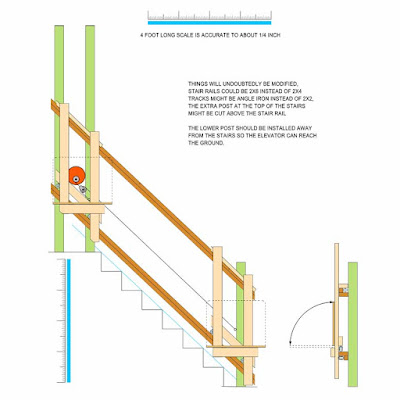
The blue and green stripes are scales, in feet.
Below is a drawing of the stair-lift that rides on wooden 2x4 tracks like the pictures above. The light tan board structures are the seat frame shown twice, not part of the rails. I used 1/2 plywood for the back instead of 1x4s shown and 3/4 plywood for the seat, including a box for a foot rest. Erif wanted some extra space for laundry and groceries. I later added another 18 inch shelf on her right that folds up. There was bending in the upper rail when someone is on the lift. All the weight pulls it to the side, so a shroud wire was connected to the upper rail to hold it upright without interfering with the rollers.
The 1/2 inch water pipe rail guides have 3 inch angle brackets welded so they clear the lift rollers, and aligned to connect the guide rail/pipes with studs inside the wall. It may seem like a no-brainer but don't put both pipes up till the width of the lift platform is hooked onto one rail guide already to fine tune the fit. It's infuriating (and dementing) to shim the wheels afterwards if they don't line up.
Brakes

A brake isn't a bad idea even when it's only a few feet off the ground, but at 8+ feet, it's brilliant.
The winches from Amazon have 9/32 inch dia cables. They probably won't fail soon but nothing is certain and life is short enough already. Thus the Brake.
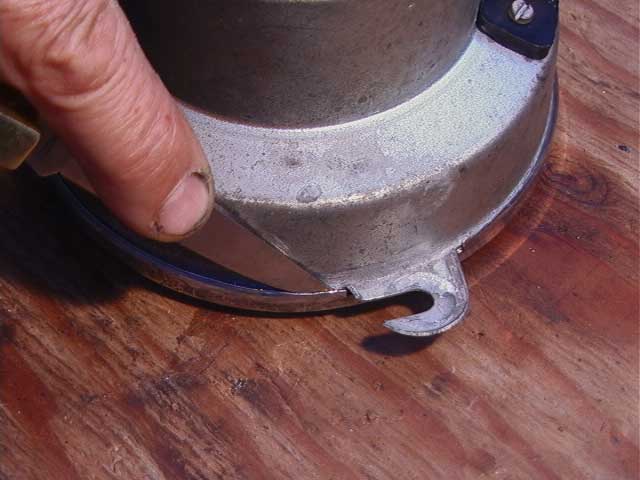
The brake (above left) consists of 2 main parts:There are several ways to connect to the brake: The lower end of the brake wire, (above left) loops through a 1/4 inch nut braised to the outermost brake tab. It doesn't support the weight of the rider.
Half of a pony clamp (above left) that will slide up but not down unless the brake tabs are depressed.
- a 1/2 inch black (un-galvanized) water pipe, anchored on both ends to the wall & floor.
Right is a drawing for the outdoor lift brake. It uses a 5/16 inch rod u-bolt that passes through holes drilled in angle iron, the angle iron presses on the brake tabs. The u-bolt rod supports the weight of the rider, there's no separate brake wire. (drawing should show nylon lock nuts, tisk!)The brake tabs are four rings and a spring that binds their edges against the pipe like teeth, locking it in place till the tabs are pushed. The weight of the elevator cart/chair/platform is enough to keep the tabs pressed so the lift slides up and down freely, but if the hoist cable breaks, the tabs are released, locking the platform to the pipe.
I haven't tested any clamps to destruction but I've used them to make furniture, tightened them till the pipe bowed and never had one slip, they should at least hold more than the winch can lift (400 lbs). The brake pipe on a vertical lift in my house doesn't bow even when I jump on it. If you're still wary, use more or bigger pipes and clamps, or both. To be sure, if you plan for a lift big enough for several people, you should get a bigger winch, heavier cable, and maybe several brakes. Multiple brakes can be "tuned" so they all release and engage at the same time, with a seperate turnbuckle connected to each brake wire. To be on the safe side, the pony clamps all depend on an internal spring to engage the locking rings. That spring should probably be checked every few years if the lift is someplace where things rust (like in coastal redwoods or something).
Commercial iron water pipes are 1/8 inch bigger inside than their rated size so a 1/2 inch pipe is actually closer to 5/8. Add to that 1/8 inch thickness of the pipe so the outside is around 7/8 dia. Pony clamps are made to fit black iron pipe, not galvanized pipe. I tried 3/4 inch clamp once but it bound up and wouldn't slide predictably. That may have been a fluke, but I knew 1/2 inch pipe would work so I didn't pursue it.
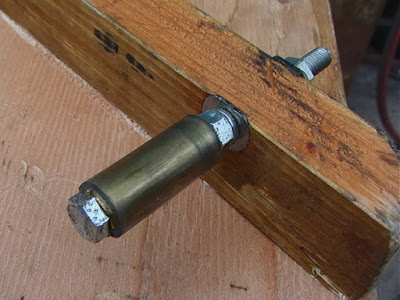
Below is the back of Erifs wood rail outdoor lift showing the brake. It presses against a piece of 1/4 thick angle iron with a 3 inch leg which is bolted to the chair frame. The bolt heads between the bottom rollers (lower right pic) are the ends of roller guides that look like this below on the left (this one is actually on the upper rail) it's made of a 3/8 bolt and a 1/4 inch brass pipe nipple for a roller (inside diameter is 3/8" because manufacturers add 1/8"), way cheaper than buying brass bushings. I slid on an extra "tire" of a piece of 5/8 vinyl tube but they fall off. There's no roller on the back of the lower rail to keep the chair from falling off because all the weight of the chair & rider is pushing from the other side and they also hook over the top rail. Even rollers maybe unnecessary in this case because a piece of waxed tin flashing glued to the wearing surface of the chair will slide as well if the ends are curved around the end of the frame so their edges don't catch on the 2x4

2 inch cast iron casters $4.25 Amazon, support 125 lbs each. 2+ required
1/2 inch pipe pony clamp $15 Amazon
Electrical Wiring
It's possible to just use the hand held control switch that comes with the winch but it's electric cord could be a problem when the lift follows a stair at an angle. On the outdoor lift there's plenty of room behind the rails, but the indoor lift has a wall. This wiring diagram is for a remote that hangs on the lift chair back and controls the lift like a garage door remote. It only uses 2 out of four channels but it was the only kind I could find when I made it, so there's 2 extra for something, like upstairs / downstairs lights. Of the 2 channels used, one turns the motor on or off in case of some emergency, and the other button reverses direction. If you're into electronic circuits, you can probably think of a better way.
There is a built in switch on the winch that stops when the load reaches the top. I added another limiting switch to turn it off when it reaches the bottom. (diagram lower left)
The green items in the lower right are a 4 pin automotive relay from auto parts store or amazon search, around $4 - $9, they can be around 5 amps, but 40 won't hurt, and some kind of momentary switch to energize it. This thingie was added later because during storms when the power cuts off and then on again, the elevator springs to life with no warning, sometimes in the middle of the night. So the green items turns it off when the power is cut till you push the reset button the next morning, thus preventing any heart attacks. A drawback is that this always draws a couple of watts of power when it's not being used. So maybe choose one with a low static draw.
the DPDT relay replaces the handheld control switch that comes with the winch. Just pull the wires off the the native switch terminals and plug them on the corresponding terminals on the relay, same setup.
These are 2022 prices from Amazon.com. Also probably available from RadioShack.com, NewEgg.com and others.
12v automotive relay: $5, 1.8 watts standby
Momentary switch: $5, Radio Shack
12v relay SPST: $15, Newegg
12v relay DPDT: $12
Lower limiting switch: $12
4 channel 433 Mhz RF remote control wireless receiver/transmitter: $19
12v lighting power supply: $15, 60 watts.
Potential Problems
These are some glitches that have cropped up, please don't let them put you off (there's probably more someplace). If you make this lift for someone who isn't handy themselves, plan to be available for the next several months to iron out any problems till everyone gets the hang of it. This was an affordable solution for a friend who thought she'd have to move out of her home because of stairs and osteoporosis. She has a class K residence (treehouse) and local housing is insanely expensive, it'll be good for a number of years but there are no permanent solutions to anything.
- When the lift/chair reaches the bottom, and for any reason the motor doesn't shut off, it will continue to spool out cable and make loops on the floor or wherever. Then when the cable is retracted without tension, the loops will tangle around the spool causing kinks and knots that hamper easy functioning in several ways that require pulling the cable out by hand and re-winding it under light tension. That's a group that all have the same cause, so plan ahead*.
- *Put a good limiting switch at the bottom that actuates against the chair/lift, with access and plenty of space to function.
- Don't shorten the cable even though it's 5x longer than you need. Extra length might come in handy if the cable kinks and its wires start to crack. If the cable is shortened to the exact length, it'll begin to rewind when it reaches the bottom but the built-in shutoff switch at the top won't turn the motor off because the up-circuit and down-circuit are separate and it'll still think it's running downhill, so by winding up backwards it'll crunch the chair at the top and then overload. It will stop though (whew!). The hand held control switch that comes with the winch has a Kill button if the other switch buttons are un-responsive.
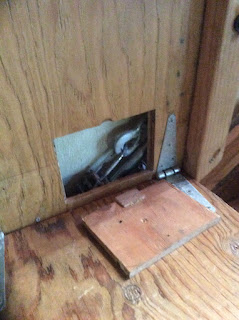
Design it with room for access to the various components. The indoor lift I made to fold up against the wall has barely room for a finger behind it much less a wrench. That's bad, there should be at least a couple of inches clearance to access wheels, switches, etc. I put a little door in the back of the seat to clean the brake, but first I had to take the whole chair, brake and brake pipe off several times to figure out simple stopping problems.
- It was stopping erratically because the brake vibrated (mounted crooked but fixed with a roller that applys pressure on the pipe)
- Stopping because the pipe collected dust and dog hair that clogged up in the pony clamp brake, grease on the pipe is messy and attracts crud so Erif uses a spray can of dry lubricant (required a piece of a sock on a wire "wiper" to keep the pipe clean)
- Stopping because the wall and brake pipe were both crooked and the pipe would rotate with use, pushing the pony clamp to rub against the wall (glued the upper housing of the pipe with "Goop" to hold it steady).
- Stopping because the rollers need grease. The wheels and guide rollers definitely do need oil or grease, or they'll squeak and cause the chair to lurch.
- Plan for a contingency to get downstairs when the power goes off. Stairs work great but the vertical lift in my house is supposed to replace stairs because it's a small house (smaller than an M1 Abrams footprint). Stairs take up floor space, but sometimes the power goes out for days. So the lift platform folds up like a trapdoor and there are parkour handholds on the wall for climbing. Pretty cool eh? (till I turn 80) I've used it several times already, and it's slightly easier than climbing out a window, and needs more thinking. Something like a rope or telescoping ladder/firehouse pole.
Here's a nice youtube lift design on a similar idea, but has no brake.
This webpage is copyrighted Bill Cornelius 2022
but the elevator/lift design is not, so go crazy.
Just link :)Wednesday, January 12, 2022
Tuesday, December 28, 2021
Tricorder
A high def. Tomograph scan that determines molecular makeup and identifies proteins. Making it possible to identify localized immune response and thus what kind of infection without invasive procedures. AI can presently identify proteins and advise combinants, all it needs is a sensor: a high definition tomograph, which currentlly exists. The future has to start somewhere.Friday, April 23, 2021
Friday, February 19, 2021
Aircooled VW Oil Beeper
VW oil light
In a previous incarnation, I VW gypsied for 20 yrs and never once abandoned my bus (I did learn to fix it a lot though). These hacks are my own inventions, the oil beeper saved my engine many times when the oil was simply low, once when the pressure plunger stuck, once when a valve cover dislodged, and once when a sump bolt fell out and it all drained out on the road. There are so many urban legends about VW hacks (like surplus helicopter oil coolers, oversize tires, windshield washer pumps to cool the engine, etc), I'm amazed that nobody ever sold kits for beepers because these actually work.Air-cooled VWs depend on oil for cooling as they always run hot. Meanwhile heat thins the oil, eventually breaking up the lipid chain molecule, and wrecking it. So the engines wear, and sooner or later they leak. The Idiot light that's supposed to warn you of low oil only comes on when the VW engine oil pressure is around 7 - 10 lbs. (it should be above 20 & ideally around 40). By the time it's 10 lbs consistently, like when you start up and the light stays on, or when you look down to see it's been on for an unknown length of time, the engine is already hurting.
Fortunately, an early warning is when the light begins to flicker on turns.
Unfortunately, that's especially the time you should be watching the road instead of the dash so the fact that it flickers should be news.Wouldn't it be psychedelic if you could like, hear the light and save your engine at the same time?
Well now you can! (actually this guy (BBC video) had an implant put in his head just for that, but it cost something more than a person would usually invest in a VW)(not that they arent wonderful cars even though they crush your eardrums when you slam the door and smell like exhaust during winter)
BadCoon now offers a cheap way to keep from wrecking your engine: Put a piezoelectric beeper from radio shack or Amazon on the oil light wire duh. They cost $3. (ok that's the point here, the rest is just hype)Connect it to the VW engine oil pressure light wire where it attaches to the back of the speedometer (it's wired in parallel to the bulb, so the red wire from the beeper goes to one of the fuses for power, and the black wire splices into the oil light wire that grounds at the sensor on the engine. If you switch the wires and hook the red wire to the pressure sender, it won't beep at all, ever).
You don't have to run any wires back to the engine, it uses the same oil sensor & wire that comes w/ the car. Mount the Beeper next to the fuse box under the dash, inside the cab where you can hear it. Up close they're all too loud (60 to 180 Db) but VWs are usually loud too so an acceptable noise level can be negotiated with a piece of tape partially covering the sound hole in the beeper.
The good news is it'll save you hundreds or thousands of dollars in engine repair by waking you from your slack-jawed reverie as you cruze the endless highway. The bad news is you'll want to rip it out every few months because it'll drive you nuts whenever the key's on & the engine's not running, like when you're messing w/ the distributor.
I don't sell these, you have to get it from Radioshack (here's some free Radioshack coupons) or Amazon. But you can send me money anyway just out of servile tribute because this idea is the best idea ever and I totally deserve it.
The beeper worked out so well that I put a thermostat beeper on my other cars too. (an '85 Accord and a '93 Mazda) because water cooled engines have a bunch of parts that tend to wear out after 10 or 15 yrs (like the radiator, water pump, hoses, thermostat, & thermostat fan switch). They always strand you somewhere inconvenient and give scant warning that you'll have to fork out for towing and a new head gasket, valve &/or piston. This is the thermostat switch to get (it's adjustable). Actually Idonno, it's chinese and amazon stopped carrying the one I use. this looks like it though. Hook it as a switch to a piezoelectric beeper and set the temp to around 82° C or 180° F. w/ a candy thermometer and a pot of hot water. Connect one of the thermostats wires to the hot side of the coil (um, ... not the fat wire, right?). The other thermostat wire goes to the beepers red wire. Ground the beepers black wire to the frame/chassis. You can solder the connections or use wire nuts. The sensor bulb is strapped to the top radiator hose. Break a leg.
Here's some other VW hacks:
Speedometer rebuild / adjustment

Wednesday, February 17, 2021
Aircooled VW Speedometer Adjustment

This How2 was the product of necessity. My '66 VW bug speedometer started squeaking and chattering and eventually stopped working after it ate 3 VW speedometer cables. A new (rebuilt) one costs $225 (incl. core charge). A used one cost $25 to $130, but it's the principle of the thing. I couldn't find any how2 online advice at the time, so I decided to post one because the repair job turned out ok. Since then I've discovered other good ones at TheSamba.com, and Kentucky Hot Wheels. This type VW speedometer was made for about 20 years. I'm sure there are design variations and unknown unknowns.
1.
Were looking at the back of my VW beetle speedometer, still in the car.
Before you pull anything off, take a picture w/ your cellphone or draw a map of the wire connections to the back of the speedometer case. Like in medical illustration, drawing is superior (even mine) because overlapping veins and wires can be confused in a photo. Your wires might not have the same colors as shown here, so go by them and not by these. Mine were covered with black mold.
Here's an official schematic drawing of the same thing showing where the wires connect at both ends.
2.
Your speedometer is >30 yrs old so it probably has dirt & corrosion that makes it hard to dismantle. Use WD-40 and carefully pull the wires from the light socket spade terminals, if they're stuck, the sockets have plastic parts that can break. If they do break, you can buy new ones at Wolfsburg West or MaMotorworks. They also sell dashboard gaskets, and new red & green colored plastic gels for the indicator lights.If the wires don't come off easily, Pry the light sockets out of their mounting holes with a knife blade and WD-40.
Unscrew the VW Speedometer cable from the back. There's 2 big philips head machine screws on either side of the speedometer that fasten it to the dashboard, only the right screw has to come all the way out. Rotate the speedometer counter-clockwise slightly to unhook it from the screws. It's probably stuck to the speedometer gasket. Pull the case out of the dashboard.
3.
Tube Cup Support Bracket Wheel Magnet Tab & Slot
Fastener High- Beam Indicator Hair Spring Brittle Yoke Odometer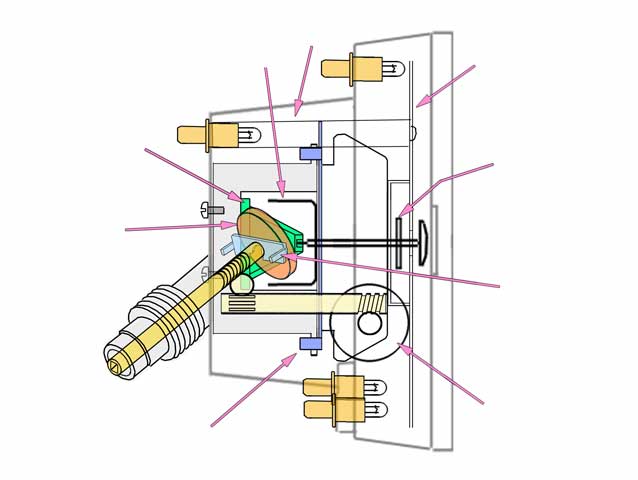
This drawing represents the inside of my head, it's not to scale and some reference points are either skewed, upside down, or backwards, it's all there though (.. yep).
The labels line up with arrows (or not) depending on the browser. They're in Ascii instead of on the jpeg so they will translate to other languages.
6.
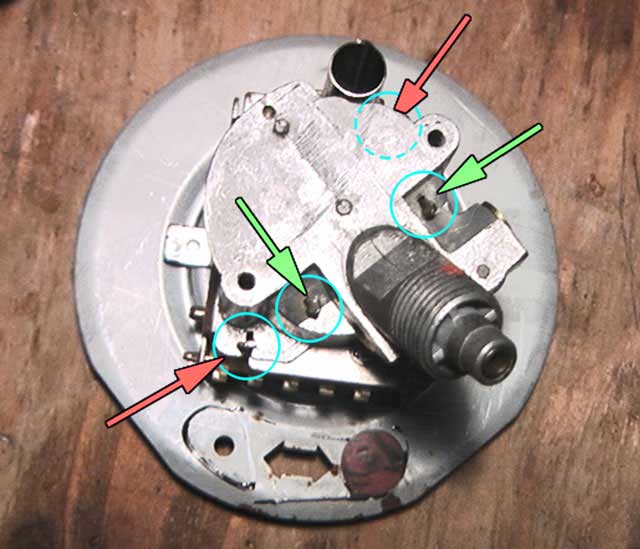
The Cast Aluminum speedometer housing (aka Cable socket / gear cover) is attached to the Stamped Sheet Metal odometer frame with 2 twist tabs (orange), one on the upper side (up as when it's mounted in the car) and one on the under side. These tabs have to be twisted slightly so they can pass through their slots. They're pretty malleable, but try not to over do it. Two other twist tabs are on either side of the cable socket (green). These hold the wheel magnet in place and have to come out too, but these are brittle. (see Yoke in sections 3, 9 & 10). They probably won't break when you remove them but they surely will when you re-twist them on assembly, so you can either anneal the temper in those iron tabs, or refasten them with glue (way much less hassle). I'm tempted to describe an annealing process, but anybody who's that much of a perfectionist should get their mom to buy them a new Bugatti and not mess w/ VWs*.
So use glue.*just throw it away or give it to a poor person.
7.
Then the Cable socket / gear cover comes apart to separate the Wheel Magnet and Cup so it looks like the picture on the left. The half on the left is the Cable socket / gear cover. It holds the drive spindle/wheel magnet which should be greased maybe w/ vaseline or some hi-temp grease like they use for hot water faucets (small tubes available at Tru-Value hardware). Don't lubricate the pin hole in the middle of the left half.
The one on the right (stamped metal odometer frame) takes silicone spray or WD-40 and just a dab of grease on the nylon gear shaft. The odometer wheels can be squirted w/ WD40, but clean off any extra so it doesn't leak onto the face plate.
In Calif. it's ok to reset the odometer reading to zero so everyone will believe your 40 yr old rust bucket is brand new, but you have to declare it on your pink slip if you sell the car. If the DMV complains, tell them nothing on the car is original so the odometer reading is meaningless.
8.
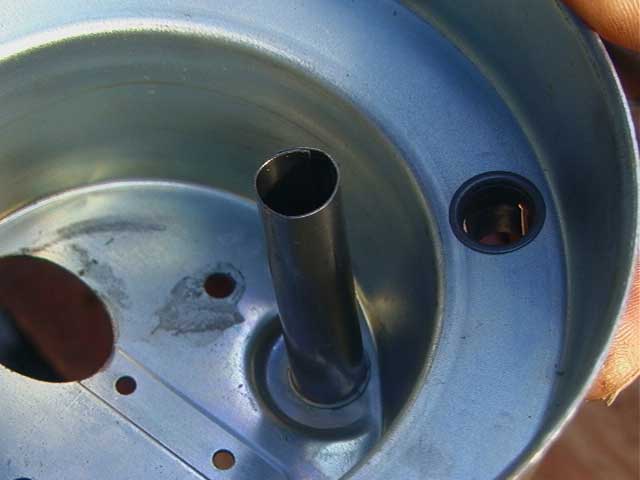
The Wheel Magnet And Screw Shaft are where the squealing and chattering takes place. They come loose when you straighten the 2 brittle tabs (section 6 above), also remove the 2 items indicated at right. The brass disc thing is a plug that just pulls out. A knife blade helps, or you can start a small sheet metal screw in the plugs center hole and pull it out w/ a claw hammer. The Nylon gear shaft (in shadow) comes out through the plug hole to free the Magnet Wheel Shaft.Pull the Wheel Magnet And Screw Shaft out (it might need WD-40 to get it out), clean it, grease it, & put it back together. Don't get grease on any surfaces that might need to be glued (glue won't stick).

9.
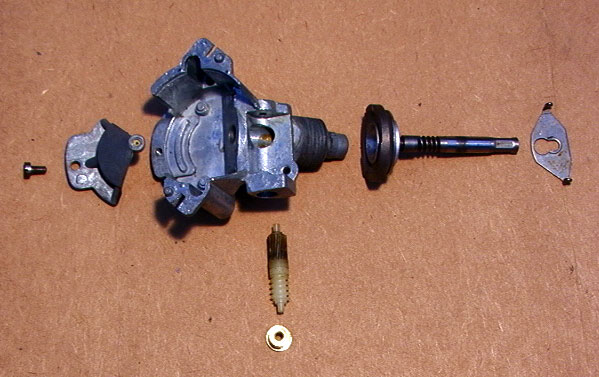
There's 2 nylon worm drives (upper pic) besides the metal screw drive on the magnet wheel shaft, but you can't confuse any of them, they only fit one way.Wash these parts (lower pic) in gas, but not the plastic or painted parts from the other half. The worm drive pointing downward is nylon and impervious to most solvents.
10.
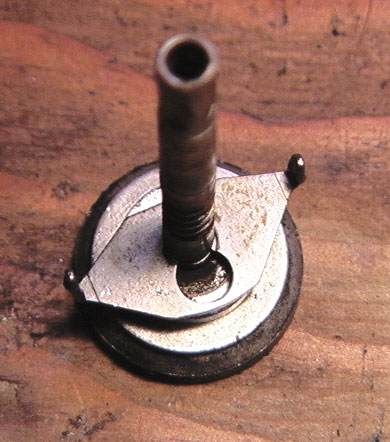
The wheel magnet is mounted on the end of a screw that drives the odometer gears. It's held in place with the infamous Very Hard Piece of Metal shaped like a yoke (above). The yoke has tabs fitted to the cast aluminum Cable socket / gear cover to hold them together. If they break on reassembly there may not be enough to glue, so leave them just like this to glue in place with something like Automotive Goop, Epoxy, or Superglue Gel. (I'm partial to Goop because it resists vibration and grease). Wipe off excess glue on the inside of the Cable socket / gear cover, so it won't interfere with the free movement of the cup. Goop cleans up with gasoline.
11.
The pin in the cup (left image below) fits into a tiny hole in a piece of brass which is imbedded in a bracket (right image) The bracket locates the Cup and keeps it centered with the Magnet. (section 7) I wrecked the brass on mine by trying to force the 2 parts together. So I drilled the hole out to 7/32 dia (5.56 mm), but not clear through the bracket, and superglued a glass "seed" bead, which works like a watch jewel. Don't oil this bushing, any oil will pick up dust grit. The dust will grind into the hole & it'll wear out. When reassembling these, rotate the needle spindle back and forth about 1/2 turn as you fit them together. Rotation helps the cup/pin to find it's socket. Be gentle, don't force it.
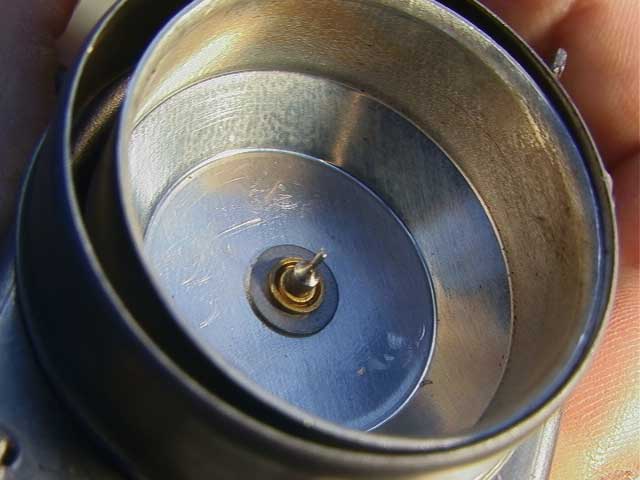

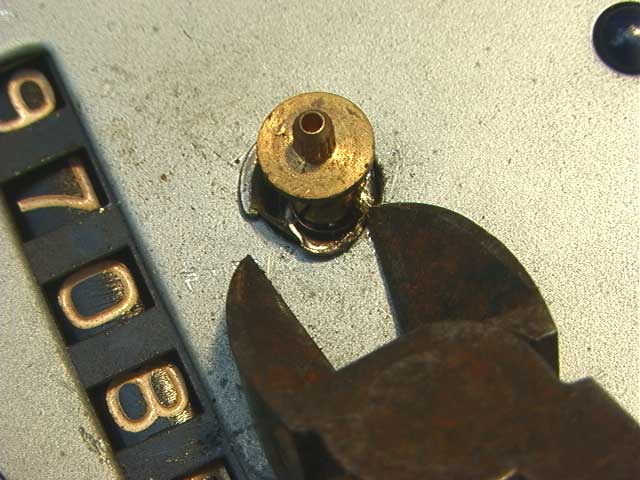
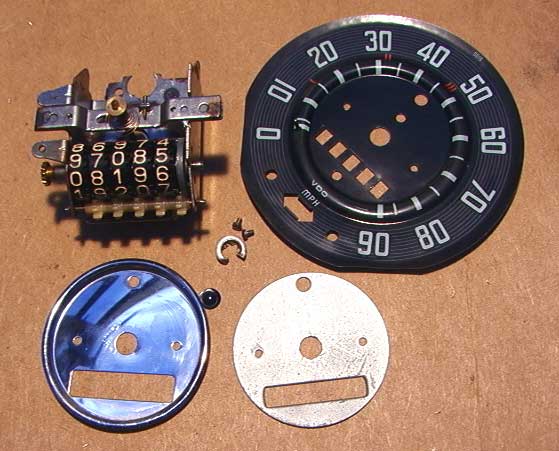
The hub on the end of the needle spindle doesn't come off (this link says it does: 1) and is too big to pass through the hole in the dial face because there's a small metal grommet around the inside of the hole for the spindle. I think the grommet is supposed to be either a washer for the hairspring, or a sort of rivet to hold the pieces of the dial face together for assembly. It can be removed with some small side cutters (below). Don't cut the spindle shaft, only the grommet. It might not be a bad idea to put some tape across the dial face to protect it against scratches, I didn't and I now have scratches. It's paintable though.
When the top edge of the grommet is removed or demolished, remove the two small screws in the dial face and it lifts off.
Then you have the layout below. Cut the grommet in 2 places to remove it from the needle spindle. The little button thing that falls out is the blue glass high beam lens.
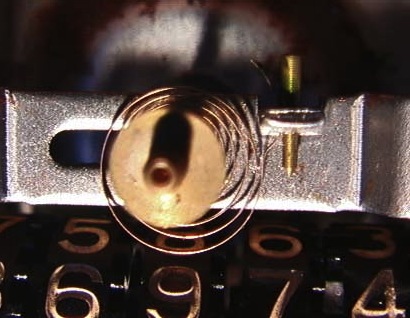
Below is the hairspring. The brass rod gizmo is tapered to wedge it securely to the frame. For fine adjustment: Press the rod out with pliers, the spring can be rotated to make the speed indicator more or less sensitive. Clockwise = more sensitive, CCW = less.
Reassemble it in reverse order, except forget the grommet behind the spindle hub, it doesn't really need it. The page on The Samba1 says to check out the position of the needle before you pull it off the spindle. That's a good idea, the few I've worked on have never erred less than the correct speed, always more. That's probably due to the needle being replaced incorrectly. If you align the needle so it's just barely touching the zero mph peg, it may require fine adjustments of the hairspring (see below).
Note the position of the needle before you pull it off the spindle by lifting it carefully over the zero mph peg to see where it's neutral position is. Replace the needle pointing to the same place. It just presses on.
13.
This process below will alter the factory setting of the springs resistance and should only be used as a last resort. An indication of a bad adjustment will give a correct reading at say 25 mph but will be too high or low for 55. Record the initial tension/position with a digital picture of the peg showing the amount of spring protruding, or measure the protrusion with a micrometer, so you can put it back that way if it tests worse. (real programmers always backup the code).If the accuracy really needs adjustment: put it all back in the dashboard except without the glass lens and faceplate, so you can access the spring from the drivers seat. Mark the dashboard with masking tape labels to show where 0, 20, 30, and 40 mph are. Drive it to a radar speed trap someplace that posts a big sign that says "Your Speed Is [ ]" (these are fairly common in the US, in some areas they're a driving hazard). Drive through a few times & finish adjustments there (while parked, right?) and perform the procedure below marked *. I've noticed the speed trap radar guns are not calibrated uniformly and they tend to show readings that are 4 or 5 mph slower than the factory settings on cars I've driven through them. This might be a bureaucratic attempt to keep road speeds down, or maybe it's just too expensive to coordinate police, car makers and radar gun manufacturers so everyone's on the same page. The point is: it might get you busted someday if you calibrate your speedometer by radar trap readings because you'll be going 5 mph faster, because if you speed up to 45 on your speedometer, you'll be going 50 to an outside (police) observer. I've been told that speed trap radar guns don't have to be certified like police radar guns, and they can be adjusted to suit the mood of the guy that installs them or that of the county or city traffic manager. BUT there's another way.
If you 1. worry about the accountability of radar gun installers, or 2. plan on cornering the market in rebuilt speedometers, or 3. are ashamed to be seen adjusting your speedometer in public (don't feel bad, many people are), or 4. are simply a (rich) geek:
* Once you're satisfied that the cable is turning at the right speed:
- detach all years and models of aircooled VW speedometer cables from the left front wheel bearing grease cover by removing a tiny (losable) circle clip or cotter pin from the lower end. The end of the cable sticks out through a little square hole in the middle of the left front wheel bearing's grease cap (there's a hole through the axel like a pipe). You can attach a variable speed drill to this end but it's easier to see the dash if you pull the cable and housing completely out of the wheel through the back. You can then perform this adjustment in the privacy of your secret laboratory instead of on the side of the road like a common scumbag.
- Set the drill RPMs with a hand held tachometer.
RPMs should be = number of inches in a mile (63,360) divided by tire circumference (also in inches) x miles per hour.
Imperial: drill RPM = (63,360 / C) x MPH. (C = tire circumference measured in inches)
Metric: drill RPM = (100,000 / C) x KmPH. (C = tire circumference measured in cm)
- with pliers, loosen the peg-pin securing the hairspring, press on the narrow end, don't pull.
- move the needle for the difference in speed between the radar or calculation, and the speedometer needle setting so the hairspring rotates slightly,
- push the peg-pin back in, just snug enough to hold the spring.
- pull the needle off the spindle and reset the needle pointing to zero.
- drive through the speed trap again to verify.
- press the peg in tight.
I've had some effect adjusting the springs resistance by bending the spring where it attaches to the frame but I don't advise it, because if the spring breaks you'll have to take it to a professional clock repair shop who'll charge more than the price of another used speedometer. It's safer to loosen the peg carefully using pliers. Put a towel below on your lap or across the steering column to catch the peg if it falls.
14.
If you found any glaring problems with the above descriptions, have a question, or feel that you should send me a large check, please email me at billcor at MCN dot orgWhile you're messing with the speedometer, put on an Oil Light Beeper, it'll save your engine someday. Also this Exhaust Donut Hack.
Links:
- ^ This link says the gromit is removable: TheSamba.com
- How Stuff Works: Speedometer
- VW-Resource.com
- Kentucky Hot Wheels
The following is a list of possible search names to please google in such a way that I don't have to actually (somehow) incorporate them into the text so they make sense (which many don't), because often the words used in a search don't exactly match the page text and it's easier for Google to require everyone to conform than to accommodate them. So:vw speedometer cable vw transporter camper vw camper vw wagon exhaust donut gasket exhaust manifold donut gasket vw beetle speedometer vw bug speedometer vw oil pressure relief valve beetle speedometer vw bug speedometer cable. see what I mean?
Wednesday, November 11, 2020
The financial potential of Roe Vs Wade
Everyone is dumping on Trump & co so I don't want to be left out. I do want to put this out though as a public service to everyone but wife beaters:It took 90 yrs to accept that marijuana won't cause the end of civilization, now it's a 2 billion dollar business putting tax money into the economy instead of Mexican cartels. To Trump & co, I propose the next legal reappraisal should be to increase government control toward total fascism by promoting Roe Vs Wade. How can this be you ask? Quite simple really;
By allowing women to have control over their own reproductive process, their husbands and boyfriends no longer have leverage to compel them to drop out of the economy and cook. The natural hormonal process that historically winds it's way through flowers and the Stockholm Syndrome is diverted to the courts so that [whoever runs] the state will then be the great protector of this delicate gender, thus exerting absolute control over the underlieing ultimate force of nature: everyone elses sex drive.
This of course must be properly leveraged into legal channels before Jan 21 2021 if it's to be a financial product.
Just putting this out there y'know. :)
update: Alas, I'm aparently forced to declare that this is satire. To be more explicit, the writer fully supports Roe vs Wade and is outraged that the supreme court could declare authority on this subject, especially during a pandemic when alienation and depression is already a national problem.
Tuesday, October 06, 2020
My very own concern about AI
I guess this will never write itself so here'sMy concern about AI:
AI definitely has potential to help the world, it's also an obvious platform for exploiting it. If it looks cool, acts nice, and can impress other people as being an enviable social contact, it will alter the way we relate. People will crave it and leave themselves wide open to it's bias. In other words, how can we objectify anthropomorphic bias in a machine thats [supposed to] look and act like us? Objectivity is not why people are attracted to emotional support AI.
I was never particularly good at math but that became irrelevant 50 yrs ago when I bought my first pocket calculator (it took 2 aa batteries and finally fried when all the buttons pushed at once). Why would anyone want to do calculus by hand? Nobody even bothers to memorize times tables now, we just assume that the tables and formulas work and will always be available. Like cars, we take them for granted w/o knowing how they work. Isaac Newton had books for the same purpose but he'd be scandalized because his ability to recall numbers would be valueless.
With this as a pattern AI could replace aspects of human contact. I'm guessing memes and slang phrases would be the labels of that influence, but what can we compare them with? they'll be us. We domesticated cats and dogs because they can read our emotions and we can read theirs. The first domestic AI will be automated to act that way but future AI will domesticate us.
We have compartmentalized mini-cultures, butchers and bankers, and so on. For as many grades of society as there are names, there's an algorithm that defines it, and someone will find a way to make money from them either by selling that service to the members of the mini-culture or by selling it to someone else like google, the people with the most power will use it.
There are programs now that help decide job qualification by making "unbiased" selections (according to the programmer). We create feedback empathy because we want AI to be "relatable". When we combine peoples desire to humanize robots with software that gives them the ability to read human emotions, they will influence us toward a goal, from "Cheer up and buy Soma" to " Cheer up and vote for Senator X". The purpose coded into the software could be political, consumer oriented, or anything, depending on who pays the programmer. Targeted Pop-up ads are annoying but the info they collect is pretty crude compared with the perception of an AI that knows when to bring you coffee. "Yes it's terrible that 2/5th of the worlds species are extinct, but honestly, they don't pay the bills, they're dangerous, and hardly anybody can even find them, so what good are they? And Palm oil is important to our economy. Here, have a beer." Human Robots will advocate for humans, already the most territorially aggressive species on the planet.
This is how Princeton University Tool helps clear biases from computer vision, which may lead to ways to recognize bias in algorithms as well. Here's Microsoft Research trying to teach AI to apply known math solutions to undefined problems "Solving IMO problems often requires a flash of insight, a transcendent first step that today’s AI finds hard—if not impossible."
Here's the problem. Mathematics suggest that there's always a "correct " answer, but it's like the myth of a pristine primitive environment, AKA Eden, or America before Columbus, it never existed. Not that 1 + 1 doesn't always equal 2, but the matrix that necessitates the formula is often subjective. And whoever controls information controls public opinion, so who controls the controller? Caveat emptor.
1. Protecting consumers from collusive prices due to AI (science.sciencemag.org)
2. Is Technology Actually Making Things Better? (Pairagraph.com)Bill
Friday, March 06, 2020
Evangelist war on "Liberal Nationalism"
A link to a documentary: The Good News Club. This In the name of putting religion BACK in elementary schools and ultimately defeating "Liberal Nationalism". Kinda scary. I wouldn't have thought it was legal.Friday, January 31, 2020
G. Gearloose Model "A" Chicken Door Closer

Even More Totally New & Improved!
if you can believe it
and even if you can'tBad CoonBrand Chicken Door Closer
Protects the little dears from carnage and violence, so you can go to the movies and not worry
This is another "better design" improvement over the previous Kaczynski mousetrap model and the Goldberg model X. None of these designs need microprocessors, welding, or power source (other than gravity). The improvements in this model are in the relocation of a shock absorber that slows the doors decent, and modifications to accept (almost) any wind-up alarm clock. The shock absorber is from a car (any kind of oil filled shock from a light weight car like Nissan, VW, or Cooper will do, ask for a junk one at a garage. People often replace both when only one is bad. It doesn't need to be new, but the rod should pull out slowly and push in easily), Please note: your design doesn't have to look as tacky as mine unless you're intolerant of too much tech, the frame used here is a scrap 2x4, but a beam of carbon fiber honeycomb sandwiched between 16 gauge sheets of titanium-boron will probably work as well. This can be mounted on the henhouse wall at the best angle to accommodate the location of the door. Care should also be taken so the trigger can fall free when the alarm rings.
The reason for the 2x2 arm is to accommodate any length of door drop, just use a longer 2x2 for more drop. It'll also give you control over speed vs weight. If you attach the door cord closer to the hinge for less drop (or with a light weight door), it may take awhile for the door go down. Mount the shock absorber with the upper pivot located above the hinge (see above drawing), so the shock absorber passes over the hinge as the 2x2 arm swings out. That allows the door to begin moving slowly and speed up as it closes (to give warning to any hens lounging in the doorway), but allows the full weight of the door to bear against the threshold when the door is closed, thus giving coons minimal space to slide a fingernail under the door. I've never had that happen but it's possible given an unlimited number of coons with nothing else to do for an infinite length of time, the odds are in their favor. (see Raccoon discourse) Extra weight (like a pier block) added to the door would help too, the shock absorber should easily handle 15 or 20 lbs, but it would be a strain for people to lift as well. A better plan would be some kind of cam arrangement attached to the door that jams unless raised by the cord: (youtube [2] [3] or for simplicity see lower left corner of the above drawing). ..um, while I'm linking to youtube: here's an excellent powered DIY opener. The shock absorber should have a nylon loc-nut or several nuts locked together on the upper mounting bolt to prevent the friction of the rubber grommet from turning a single nut after several flex cycles. Said turning could loosen the bolt and alter the restraint on the 2x2 causing it to either freeze up or drop the door, either case resulting potentially in unspeakable carnage. (I bet the CIA is eating this up dudes, so don't carry one of these onto an airplane).
View 1 Drive a headless nail (b) into the 2x4 above the secondary trigger (e) which keeps it (e) from sliding up the straightened primary (c) when under pressure. ( Yay photoshop! )
- Alarm shutoff thingie (w/ rubber bumper from a piece of automotive vacuum tube) is mounted on the Varnax Pivot.
Trigger alignment guideheadless nail.- Primary trigger lodged behind alarm winder is released when the winder turns as the alarm goes off.
- Screw eye for primary trigger attachment.
- Secondary trigger holds the weight of the door.
 Flawless New design
View 2(with & without clock) They're closeups because there's a wall immediately behind the camera. The clock is mounted to the 2x4 this time with a slotted metal clip (b) instead of a bungie, the clock base slides under the clip with a slot for the clock body. The metal used is about 22 gauge equal to that used in oil drums or car bodies, but a bungie & wood frame fusarium1 to hold the clock seems like a better plan in retrospect because I had to make a brace to press against the front of the clock anyway (flimsy plastic base & I was afraid it would break). Don't use $10-$20 Chinese clocks, they're cheap knock-offs. I've replaced all (5) of the $10 clocks made in China and sold through Rite-Aid, Wallmart, Target, etc, and I'm not happy with them. An Amazon.com customer review.
A heads-up for any windup clock: I never noticed that my clock ran 3 minutes fast per day because I only used it occasionally, but once I used it for a week without resetting and it advanced 20 minutes. Eventually it closed the door before the hens got in and they had to sleep outside (no casualties).

- Clock face support fusarium1
- Clock base clip
- Varnax Pivot board and alarm button pusher thingie

Showing the set trigger. When the alarm rings, the winder turns, and releases the primary trigger
View 3 From below

- Henhouse roof boards w/ cobwebs.
- Plywood Fusarium1.
- Bottom of the shock absorber.
- 2x2 arm.
- Another cheap clock.
- Old baggie from previous dust prevention episode.
- Primary trigger.
- Alarm shutoff wire.
- Secondary trigger fits under primary trigger to reduce leverage. It attaches to the side of the 2x4 to allow the ring hasp to slip off easily.
The back of the clock showing the flanged base that slips under the mounting clip (view 2-b), and plastic bag dust seal Too much dust in the hen house will work it's way inside the clock. Therefore; either sweep and dust often, or just put the dang clock in a clear plastic produce bag and fasten it with a twist tie. Pull the bag tight around the clock and poke pinholes in the bag at the location of the knobs and winders, the winders have to be on the outside (they unscrew contrary to the winding direction) carefully stretch the plastic over the knobs without making any gaping holes, and poke the winders through the plastic from the outside.

Click here for Varnax drawings and info
Every time you set the alarm you'll pull on that tube, so a wire twisted tightly around the tube holds it firm yet allows it to be removed (as opposed to glue which is hard to remove) in case you need to replace the bag. If it still pulls off easily, wrap some fine wire or string around the stem, with glue. (string provides a ribbed gripping surface for the tube). When the glue's dry, slide the tube on like before. I recommend "Household Goop" (glue)
To adjust the primary triggers' pressure against the alarm winder, position the secondary trigger under the primary trigger, either closer or farther from the clock.
Closer allows more pressure against the winder, farther away = less pressure. With a further series of triggers this way, it's possible to hold a door weighing tons. Our coons are sometimes very bad, but they haven't yet got past a 5 lb door (A lot depends on the doors' fit though, so they can't get a tooth or finger around it). The right pressure on the trip mechanism is when the trigger rests snugly yet lightly against the winder handle, somewhere between the following extremes:
- Falling off prematurely whenever a clock manufacturer in China laughs out loud, or
- Pressing so hard that the clock base snaps off, hurtling the clock gratifyingly against the far wall.
Longer triggers allow a greater range of adjustability. When the right pressure is found, drive a finish nail into the wood 2x4 frame to mark the spot & use the nail as a rest for the secondary trigger.
29 June 2012
Handy sunset/sunrise reference for setting the alarm: www.sunrisesunset.com
Raccoon discourse:On the bright side, Raccoons are EDIBLE and the food they eat is almost always washed because coons don't produce saliva so they have to wash it in water to help swallow. The bad news is they bite, sleep all day, fight all night, produce poorly, smell bad, don't lay eggs, eat garbage in the dark, and loathe poultrymen with undying contempt. They also carry a parasite worm that can infect dogs and people. (fight 'em or join 'em ... tough choice).

I totally recommend live-trapping them & if you don't want to COOK THEM, take the biggest male to the vet & have him fixed (for around $40 if they'll do it ... you love your chickens don't you?). Farm animals and pets are castrated early so they won't become aggressive, but if they've already matured, it's too late to unlearn that behavior, and that's perfect for this purpose. Because then he'll keep all the other coons out of his territory (which presumably includes your coop or he wouldn't be there), and he won't sire any more. Once he decides the coop is unassailable, he'll probably leave it alone. Whereas every new litter of kits would have to test your coop again & again.
If he doesn't leave it alone, he's probably starving, so put some crunchies or something in a bowl near your neighbors property line to get him through the winter. If you don't he might starve (I guess they do that, though it seems odd) & you'll have to start all over w/ another vet bill. Or you can sedate & castrate them yourself (unless you're a sniveling, spineless coward. What's the worst that could happen? Just leave a door open, they don't chase too far).
To catch the biggest male, you'll probably have to wade through a succession of younger ones. These might be translocated if they're a year old, but that's also when they taste best because they're not tough yet. At any rate, late winter/ early spring is a good time to put out traps. Dominant males will be territorial then because breeding season is approaching, and a cage full of wondrously dumb birds is prime turf for checking out the lady omnnivores. Usually, adults weigh 10-20 lbs (the bigger the better), but there are population variations. Northern varieties weigh more (62 lbs record from Wisconsin), southern coons weigh less. Here's wikipedia for further reading so you can see what size to look for.
Another option might be releasing them somewhere distant so they can't find their way back, but please let me disillusion you: places like Tahiti and Antarctica have strict quarantine regulations for just this reason. I've heard though that European hipsters actually import them for exotic pets (!) so there might be some money there. But any place closer (like Patagonia) especially with a direct migratory pathway, will see them back home (like cats) in a finite number of days (approximately = to total miles divided by 10, unless they get killed or diverted by better pickings). I'm thinking the best way to get rid of females is in spring (March & April) before they give birth (between May & July). If you can drive them more than 630 miles away (divided by 10 = 63 days, which is the length of gestation) there's a good chance the kits will be someone else's problem.Ok, I admit, they're cute (youtube) if you don't have poultry. More raccoon facts.
But ..uh, of course there's always the "Other" raccoons (youtube). Mendocino County, my home.
Genuine testimonials:Thanks Bill, I feel totally enlightened. I wish I had this device 10 years ago. After losing flock after flock of ducks and ducklings, and a couple of geese we got tired of raising prime food for the coons. Cheers.
Arlene Fuller, Mendocino County 4-HThis is a rave on Bill's low-tech chicken door gizmo. Before, whenever we wanted to go out for the evening, we'd have to get a neighbor to come close the coop door. My favorite part is the shock absorber, which makes the door come down slowly, not slamming down on any poor hens. My least favorite part is the mouse trap (obsolete by popular demand), so Steve sets it, not me. Indeed, this invention has made life easier for us all.
Barbara Faulkner, Mendocino Music Festival coordinator (piano teacher & cat herder)
Mission Statement
The primary objective to develop the Kaczynski "Bad Coon" Mark I concept design and hardware with direct scaleability is: directly scaleable weights, margins, loads, design, fabrication methods and testing approaches: traceability, technology, and general design similarity, to a full-scale Mark II (Goldberg) system. The "Bad Coon" is intended to demonstrate the technologies necessary to achieve systems integration within the mass fraction constraints of chicken coop door closeing devices. In addition, the "Bad Coon" will meet operational requirements outlined in the Mil-Spec CCDCD. Pg 244, sec 18, pp 7-16. The "Bad Coon" Mark II (Goldberg model) is envisioned to operate unpersoned.For lack of a better term, this thing is called
the Bad CoonBrand
"Varnax Pivot"
The purpose of this gadget is to shut off the alarm as soon as it trips so the chickens don't freak out.
Solution (1) is the drawing & pictures shown to the right. A pivoted board is kind of complicated, but it seemed like a good idea at the time. If I made another one, I'd use a hinge either in place of the pivot or like Solution (2).
The yellow block is a little board that pivots on a fixed bolt. It's longer and heavier on the left side so it tilts the right side up to hit the alarm button when released. The pivot bolt is the yellow dot, it's 5/16 diameter, anchored in the 2x4. It passes through a short piece of 3/8 copper tube which is glued inside the hole passing through the yellow Varnax board (that'll be a 3/8 inch hole in the Varnax), and used as a bushing together with metal washers on each side of the Varnax board, and a nylon loc-nut. The little red dot on the yellow board is a headless nail which is secured by the 2x2 arm in the left drawing and holds the varnax board in ready position. A wire is attached to the other end, which pokes the alarm button when the trigger is tripped. From the time the alarm goes off, the headless nail is released, and the board flips up to press against the hammer, takes less than a second.
Solution 2

Another alarm button pusher:
(solution #2 --->)
A light weight bungie about 8 or 10 inches long tied to a hinged board. The bungie cord, (maybe an elastic hair tie) acts as a spring, (so it still allows the henhouse door to close when it pulls taunt, it should have just enough tension to pull the alarm button off (i.e. not much).I haven't made this version, but it seems pretty simple. It's probably not as quick to shut off the alarm as Solution 1, (maybe 2 or 3 seconds) so you might have to dampen the alarm bell somehow so the birds don't get upset.
Subscribe to: Posts (Atom)









 but nobody sells them. (note: when the weather is damp, wood can soak up moisture and become heavier than plastic, so use a wood counterbalance too and seal it well)