In a previous incarnation, I VW gypsied for 20 yrs and never once abandoned my bus (I did learn to fix it a lot though).
These hacks are my own inventions, the oil beeper saved my engine many times when the oil was simply low, once when the pressure plunger stuck, once when a valve cover dislodged, and once when a sump bolt fell out and it all drained out on the road. There are so many urban legends about VW hacks (like surplus helicopter oil coolers, oversize tires, windshield washer pumps to cool the engine, etc), I'm amazed that nobody ever sold kits for beepers because these actually work.Air-cooled VWs depend on oil for cooling as they always run hot. Meanwhile heat thins the oil, eventually breaking up the lipid chain molecule, and wrecking it. So the engines wear, and sooner or later they leak. The Idiot light that's supposed to warn you of low oil only comes on when the VW engine oil pressure is around 7 - 10 lbs. (it should be above 20 & ideally around 40). By the time it's 10 lbs consistently, like when you start up and the light stays on, or when you look down to see it's been on for an unknown length of time, the engine is already hurting.
Fortunately, an early warning is when the light begins to flicker on turns.
Unfortunately, that's especially the time you should be watching the road instead of the dash so the fact that it flickers should be news.Wouldn't it be psychedelic if you could like, hear the light and save your engine at the same time?
Well now you can! (actually this guy (BBC video) had an implant put in his head just for that, but it cost something more than a person would usually invest in a VW)(not that they arent wonderful cars even though they crush your eardrums when you slam the door and smell like exhaust during winter)
BadCoon now offers a cheap way to keep from wrecking your engine: Put a piezoelectric beeper from radio shack or Amazon on the oil light wire duh. They cost $3. (ok that's the point here, the rest is just hype)Connect it to the VW engine oil pressure light wire where it attaches to the back of the speedometer (it's wired in parallel to the bulb, so the red wire from the beeper goes to one of the fuses for power, and the black wire splices into the oil light wire that grounds at the sensor on the engine. If you switch the wires and hook the red wire to the pressure sender, it won't beep at all, ever).
You don't have to run any wires back to the engine, it uses the same oil sensor & wire that comes w/ the car. Mount the Beeper next to the fuse box under the dash, inside the cab where you can hear it. Up close they're all too loud (60 to 180 Db) but VWs are usually loud too so an acceptable noise level can be negotiated with a piece of tape partially covering the sound hole in the beeper.
The good news is it'll save you hundreds or thousands of dollars in engine repair by waking you from your slack-jawed reverie as you cruze the endless highway. The bad news is you'll want to rip it out every few months because it'll drive you nuts whenever the key's on & the engine's not running, like when you're messing w/ the distributor.
I don't sell these, you have to get it from Radioshack (here's some free Radioshack coupons) or Amazon. But you can send me money anyway just out of servile tribute because this idea is the best idea ever and I totally deserve it.
The beeper worked out so well that I put a thermostat beeper on my other cars too. (an '85 Accord and a '93 Mazda) because water cooled engines have a bunch of parts that tend to wear out after 10 or 15 yrs (like the radiator, water pump, hoses, thermostat, & thermostat fan switch). They always strand you somewhere inconvenient and give scant warning that you'll have to fork out for towing and a new head gasket, valve &/or piston. This is the thermostat switch to get (it's adjustable). Actually Idonno, it's chinese and amazon stopped carrying the one I use. this looks like it though. Hook it as a switch to a piezoelectric beeper and set the temp to around 82° C or 180° F. w/ a candy thermometer and a pot of hot water. Connect one of the thermostats wires to the hot side of the coil (um, ... not the fat wire, right?). The other thermostat wire goes to the beepers red wire. Ground the beepers black wire to the frame/chassis. You can solder the connections or use wire nuts. The sensor bulb is strapped to the top radiator hose. Break a leg.
Here's some other VW hacks:
Speedometer rebuild / adjustment

Wednesday, February 17, 2021
Aircooled VW Speedometer Adjustment

This How2 was the product of necessity. My '66 VW bug speedometer started squeaking and chattering and eventually stopped working after it ate 3 VW speedometer cables. A new (rebuilt) one costs $225 (incl. core charge). A used one cost $25 to $130, but it's the principle of the thing. I couldn't find any how2 online advice at the time, so I decided to post one because the repair job turned out ok. Since then I've discovered other good ones at TheSamba.com, and Kentucky Hot Wheels. This type VW speedometer was made for about 20 years. I'm sure there are design variations and unknown unknowns.
1.
Were looking at the back of my VW beetle speedometer, still in the car.
Before you pull anything off, take a picture w/ your cellphone or draw a map of the wire connections to the back of the speedometer case. Like in medical illustration, drawing is superior (even mine) because overlapping veins and wires can be confused in a photo. Your wires might not have the same colors as shown here, so go by them and not by these. Mine were covered with black mold.
Here's an official schematic drawing of the same thing showing where the wires connect at both ends.
2.
Your speedometer is >30 yrs old so it probably has dirt & corrosion that makes it hard to dismantle. Use WD-40 and carefully pull the wires from the light socket spade terminals, if they're stuck, the sockets have plastic parts that can break. If they do break, you can buy new ones at Wolfsburg West or MaMotorworks. They also sell dashboard gaskets, and new red & green colored plastic gels for the indicator lights.If the wires don't come off easily, Pry the light sockets out of their mounting holes with a knife blade and WD-40.
Unscrew the VW Speedometer cable from the back. There's 2 big philips head machine screws on either side of the speedometer that fasten it to the dashboard, only the right screw has to come all the way out. Rotate the speedometer counter-clockwise slightly to unhook it from the screws. It's probably stuck to the speedometer gasket. Pull the case out of the dashboard.
3.
Tube Cup Support Bracket Wheel Magnet Tab & Slot
Fastener High- Beam Indicator Hair Spring Brittle Yoke Odometer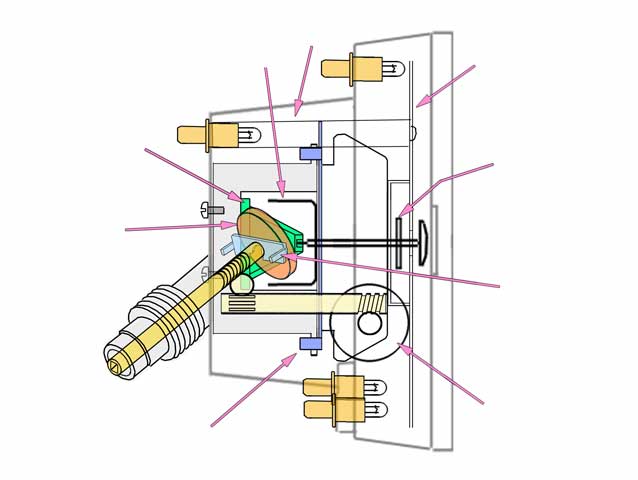
This drawing represents the inside of my head, it's not to scale and some reference points are either skewed, upside down, or backwards, it's all there though (.. yep).
The labels line up with arrows (or not) depending on the browser. They're in Ascii instead of on the jpeg so they will translate to other languages.
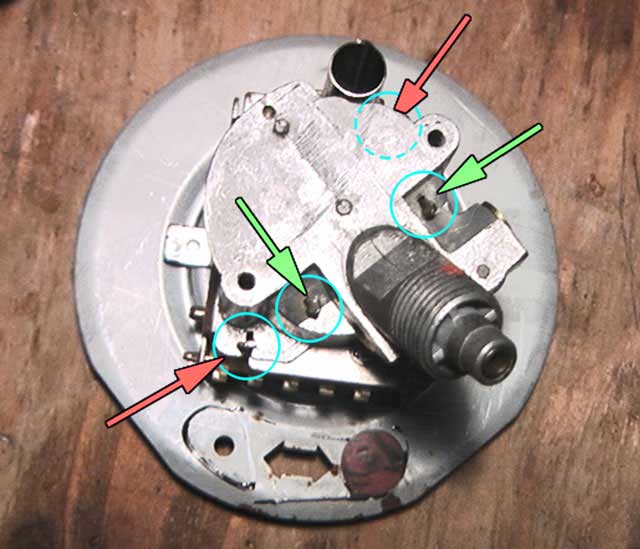
6.
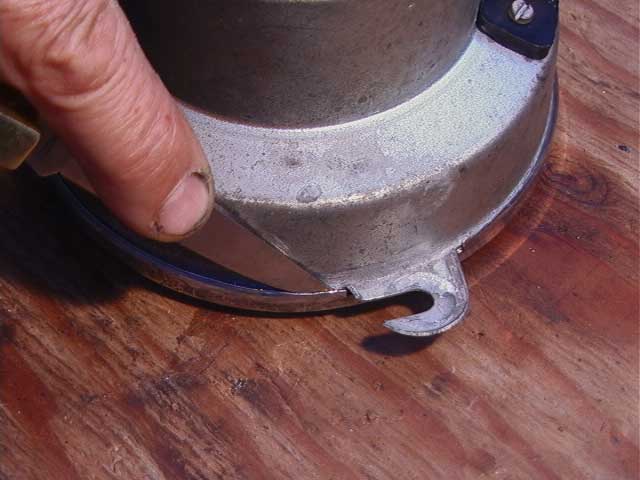
The Cast Aluminum speedometer housing (aka Cable socket / gear cover) is attached to the Stamped Sheet Metal odometer frame with 2 twist tabs (orange), one on the upper side (up as when it's mounted in the car) and one on the under side. These tabs have to be twisted slightly so they can pass through their slots. They're pretty malleable, but try not to over do it. Two other twist tabs are on either side of the cable socket (green). These hold the wheel magnet in place and have to come out too, but these are brittle. (see Yoke in sections 3, 9 & 10). They probably won't break when you remove them but they surely will when you re-twist them on assembly, so you can either anneal the temper in those iron tabs, or refasten them with glue (way much less hassle). I'm tempted to describe an annealing process, but anybody who's that much of a perfectionist should get their mom to buy them a new Bugatti and not mess w/ VWs*.
So use glue.*just throw it away or give it to a poor person.
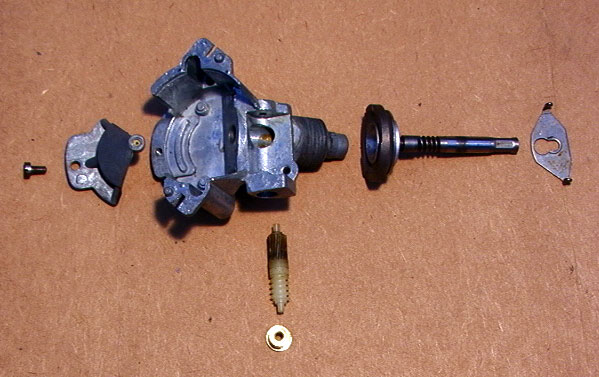
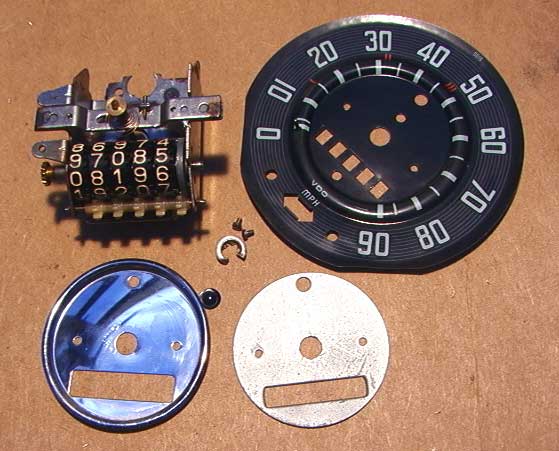
7.
Then the Cable socket / gear cover comes apart to separate the Wheel Magnet and Cup so it looks like the picture on the left. The half on the left is the Cable socket / gear cover. It holds the drive spindle/wheel magnet which should be greased maybe w/ vaseline or some hi-temp grease like they use for hot water faucets (small tubes available at Tru-Value hardware). Don't lubricate the pin hole in the middle of the left half.
The one on the right (stamped metal odometer frame) takes silicone spray or WD-40 and just a dab of grease on the nylon gear shaft. The odometer wheels can be squirted w/ WD40, but clean off any extra so it doesn't leak onto the face plate.
In Calif. it's ok to reset the odometer reading to zero so everyone will believe your 40 yr old rust bucket is brand new, but you have to declare it on your pink slip if you sell the car. If the DMV complains, tell them nothing on the car is original so the odometer reading is meaningless.
8.
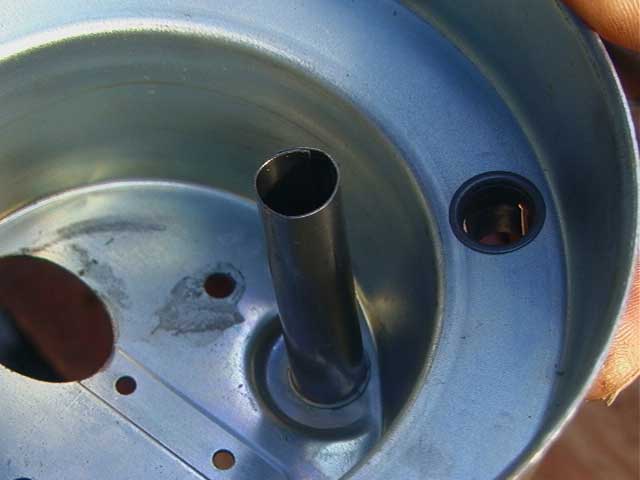
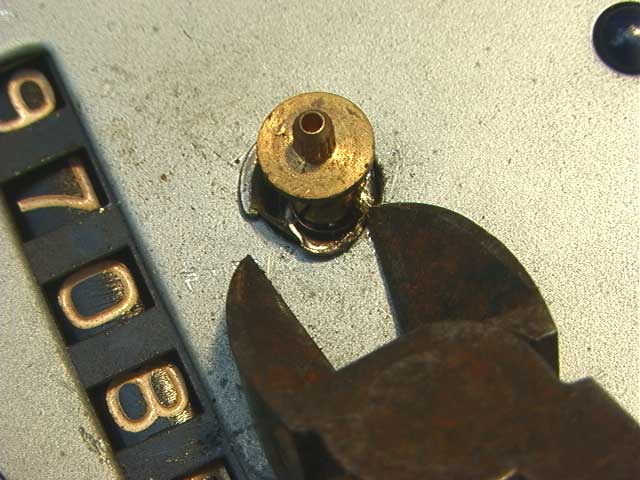
The Wheel Magnet And Screw Shaft are where the squealing and chattering takes place. They come loose when you straighten the 2 brittle tabs (section 6 above), also remove the 2 items indicated at right. The brass disc thing is a plug that just pulls out. A knife blade helps, or you can start a small sheet metal screw in the plugs center hole and pull it out w/ a claw hammer. The Nylon gear shaft (in shadow) comes out through the plug hole to free the Magnet Wheel Shaft.Pull the Wheel Magnet And Screw Shaft out (it might need WD-40 to get it out), clean it, grease it, & put it back together. Don't get grease on any surfaces that might need to be glued (glue won't stick).

9.
There's 2 nylon worm drives (upper pic) besides the metal screw drive on the magnet wheel shaft, but you can't confuse any of them, they only fit one way.Wash these parts (lower pic) in gas, but not the plastic or painted parts from the other half. The worm drive pointing downward is nylon and impervious to most solvents.
10.
The wheel magnet is mounted on the end of a screw that drives the odometer gears. It's held in place with the infamous Very Hard Piece of Metal shaped like a yoke (above). The yoke has tabs fitted to the cast aluminum Cable socket / gear cover to hold them together. If they break on reassembly there may not be enough to glue, so leave them just like this to glue in place with something like Automotive Goop, Epoxy, or Superglue Gel. (I'm partial to Goop because it resists vibration and grease). Wipe off excess glue on the inside of the Cable socket / gear cover, so it won't interfere with the free movement of the cup. Goop cleans up with gasoline.
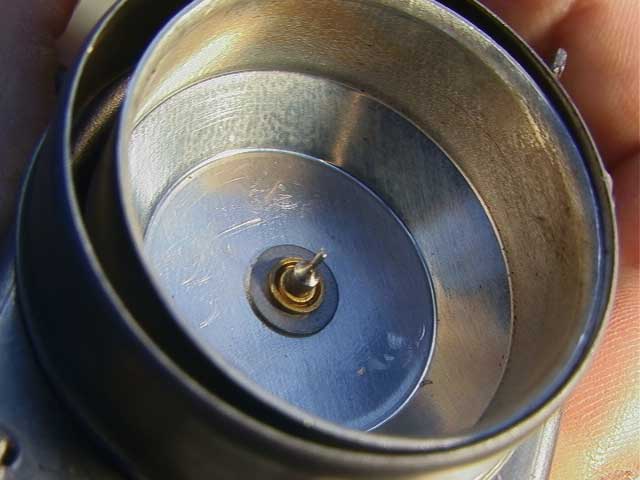
11.
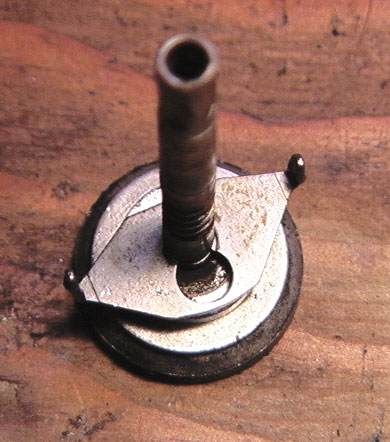
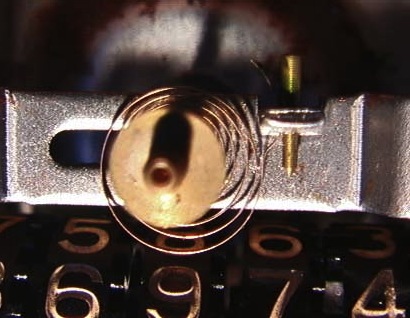
The pin in the cup (left image below) fits into a tiny hole in a piece of brass which is imbedded in a bracket (right image) The bracket locates the Cup and keeps it centered with the Magnet. (section 7) I wrecked the brass on mine by trying to force the 2 parts together. So I drilled the hole out to 7/32 dia (5.56 mm), but not clear through the bracket, and superglued a glass "seed" bead, which works like a watch jewel. Don't oil this bushing, any oil will pick up dust grit. The dust will grind into the hole & it'll wear out. When reassembling these, rotate the needle spindle back and forth about 1/2 turn as you fit them together. Rotation helps the cup/pin to find it's socket. Be gentle, don't force it.

The hub on the end of the needle spindle doesn't come off (this link says it does: 1) and is too big to pass through the hole in the dial face because there's a small metal grommet around the inside of the hole for the spindle. I think the grommet is supposed to be either a washer for the hairspring, or a sort of rivet to hold the pieces of the dial face together for assembly. It can be removed with some small side cutters (below). Don't cut the spindle shaft, only the grommet. It might not be a bad idea to put some tape across the dial face to protect it against scratches, I didn't and I now have scratches. It's paintable though.
When the top edge of the grommet is removed or demolished, remove the two small screws in the dial face and it lifts off.
Then you have the layout below. Cut the grommet in 2 places to remove it from the needle spindle. The little button thing that falls out is the blue glass high beam lens.
Below is the hairspring. The brass rod gizmo is tapered to wedge it securely to the frame. For fine adjustment: Press the rod out with pliers, the spring can be rotated to make the speed indicator more or less sensitive. Clockwise = more sensitive, CCW = less.
Reassemble it in reverse order, except forget the grommet behind the spindle hub, it doesn't really need it. The page on The Samba1 says to check out the position of the needle before you pull it off the spindle. That's a good idea, the few I've worked on have never erred less than the correct speed, always more. That's probably due to the needle being replaced incorrectly. If you align the needle so it's just barely touching the zero mph peg, it may require fine adjustments of the hairspring (see below).
Note the position of the needle before you pull it off the spindle by lifting it carefully over the zero mph peg to see where it's neutral position is. Replace the needle pointing to the same place. It just presses on.
13.
This process below will alter the factory setting of the springs resistance and should only be used as a last resort. An indication of a bad adjustment will give a correct reading at say 25 mph but will be too high or low for 55. Record the initial tension/position with a digital picture of the peg showing the amount of spring protruding, or measure the protrusion with a micrometer, so you can put it back that way if it tests worse. (real programmers always backup the code).If the accuracy really needs adjustment: put it all back in the dashboard except without the glass lens and faceplate, so you can access the spring from the drivers seat. Mark the dashboard with masking tape labels to show where 0, 20, 30, and 40 mph are. Drive it to a radar speed trap someplace that posts a big sign that says "Your Speed Is [ ]" (these are fairly common in the US, in some areas they're a driving hazard). Drive through a few times & finish adjustments there (while parked, right?) and perform the procedure below marked *. I've noticed the speed trap radar guns are not calibrated uniformly and they tend to show readings that are 4 or 5 mph slower than the factory settings on cars I've driven through them. This might be a bureaucratic attempt to keep road speeds down, or maybe it's just too expensive to coordinate police, car makers and radar gun manufacturers so everyone's on the same page. The point is: it might get you busted someday if you calibrate your speedometer by radar trap readings because you'll be going 5 mph faster, because if you speed up to 45 on your speedometer, you'll be going 50 to an outside (police) observer. I've been told that speed trap radar guns don't have to be certified like police radar guns, and they can be adjusted to suit the mood of the guy that installs them or that of the county or city traffic manager. BUT there's another way.
If you 1. worry about the accountability of radar gun installers, or 2. plan on cornering the market in rebuilt speedometers, or 3. are ashamed to be seen adjusting your speedometer in public (don't feel bad, many people are), or 4. are simply a (rich) geek:
* Once you're satisfied that the cable is turning at the right speed:
- detach all years and models of aircooled VW speedometer cables from the left front wheel bearing grease cover by removing a tiny (losable) circle clip or cotter pin from the lower end. The end of the cable sticks out through a little square hole in the middle of the left front wheel bearing's grease cap (there's a hole through the axel like a pipe). You can attach a variable speed drill to this end but it's easier to see the dash if you pull the cable and housing completely out of the wheel through the back. You can then perform this adjustment in the privacy of your secret laboratory instead of on the side of the road like a common scumbag.
- Set the drill RPMs with a hand held tachometer.
RPMs should be = number of inches in a mile (63,360) divided by tire circumference (also in inches) x miles per hour.
Imperial: drill RPM = (63,360 / C) x MPH. (C = tire circumference measured in inches)
Metric: drill RPM = (100,000 / C) x KmPH. (C = tire circumference measured in cm)
- with pliers, loosen the peg-pin securing the hairspring, press on the narrow end, don't pull.
- move the needle for the difference in speed between the radar or calculation, and the speedometer needle setting so the hairspring rotates slightly,
- push the peg-pin back in, just snug enough to hold the spring.
- pull the needle off the spindle and reset the needle pointing to zero.
- drive through the speed trap again to verify.
- press the peg in tight.
I've had some effect adjusting the springs resistance by bending the spring where it attaches to the frame but I don't advise it, because if the spring breaks you'll have to take it to a professional clock repair shop who'll charge more than the price of another used speedometer. It's safer to loosen the peg carefully using pliers. Put a towel below on your lap or across the steering column to catch the peg if it falls.
14.
If you found any glaring problems with the above descriptions, have a question, or feel that you should send me a large check, please email me at billcor at MCN dot orgWhile you're messing with the speedometer, put on an Oil Light Beeper, it'll save your engine someday. Also this Exhaust Donut Hack.
Links:
- ^ This link says the gromit is removable: TheSamba.com
- How Stuff Works: Speedometer
- VW-Resource.com
- Kentucky Hot Wheels
The following is a list of possible search names to please google in such a way that I don't have to actually (somehow) incorporate them into the text so they make sense (which many don't), because often the words used in a search don't exactly match the page text and it's easier for Google to require everyone to conform than to accommodate them. So:vw speedometer cable vw transporter camper vw camper vw wagon exhaust donut gasket exhaust manifold donut gasket vw beetle speedometer vw bug speedometer vw oil pressure relief valve beetle speedometer vw bug speedometer cable. see what I mean?
Subscribe to: Posts (Atom)
Something else besides religion, but not exclusively. There's probably more written justifying gods existence than anyone could read in a lifetime. Most of it is politically driven medieval propaganda based on prehistoric myth. But since God's ultimately a personal matter, anyone can hold god up for scrutiny, so I'm as much an authority as the next person. This is my Notebook.


 but nobody sells them. (note: when the weather is damp, wood can soak up moisture and become heavier than plastic, so use a wood counterbalance too and seal it well)


