Three similar designs are used here. One indooor stair-lift, one indoor vertical elevator (one person, or 2 if you're chummy), and one outdoor stair-lift.
Winches
These winches are from Amazon. They're Chinese, inexpensive ($120), and noisy. Mine have worked well except for some avoidable problems inherent with this use. There are lots of brands and designs. Each seems to have it's own wiring peculiarities. Some fancy push button wiring is included below for the 2 used here, but the control box that comes with it already works and it doesn't really need those bells & whistles. They were added because the handheld switch cable can be in the way and prone to tangle on the stairs. The lift shown here has plenty of room behind the guide rails but indoor stairs might not be the same.The outdoor winch shown here ---> has a wood block attached to the upper limiting switch. It was supposed to keep the cable from slipping off the spool but the cable sometimes rubbed against it when pulling and would activate the limiting switch to stop the lift. A better solution is Erifs awareness of the possibility of slack so she now watches for it and guides it back on with a glove. Doing that's a bother so she just doesn't let it accumulate slack
Important: Attach the winch cable to the centerline of the chair as low as possible where there's least pressure to tip the chair. With the rails and rollers it won't tip, but unnecessary higher tipping force could cause unplanned wear someplace else. The chair I made for the indoor lift had a higher attachment point and it sometimes chattered till I put an extra roller to press on the brake pipe.
Guide Rails
Above is a vertical elevator using 1/2 inch water pipe for rails. The winch cable shown on the left shows a pulley that halves the power and double the speed. it's not necessary, goes fast enough and doesn't need complication.
The blue and green stripes are scales, in feet.
Below is a drawing of the stair-lift that rides on wooden 2x4 tracks like the pictures above. The light tan board structures are the seat frame shown twice, not part of the rails. I used 1/2 plywood for the back instead of 1x4s shown and 3/4 plywood for the seat, including a box for a foot rest. Erif wanted some extra space for laundry and groceries. I later added another 18 inch shelf on her right that folds up. There was bending in the upper rail when someone is on the lift. All the weight pulls it to the side, so a shroud wire was connected to the upper rail to hold it upright without interfering with the rollers.
The 1/2 inch water pipe rail guides have 3 inch angle brackets welded so they clear the lift rollers, and aligned to connect the guide rail/pipes with studs inside the wall. It may seem like a no-brainer but don't put both pipes up till the width of the lift platform is hooked onto one rail guide already to fine tune the fit. It's infuriating (and dementing) to shim the wheels afterwards if they don't line up.
Brakes

A brake isn't a bad idea even when it's only a few feet off the ground, but at 8+ feet, it's brilliant.
The winches from Amazon have 9/32 inch dia cables. They probably won't fail soon but nothing is certain and life is short enough already. Thus the Brake.
The brake (above left) consists of 2 main parts:There are several ways to connect to the brake: The lower end of the brake wire, (above left) loops through a 1/4 inch nut braised to the outermost brake tab. It doesn't support the weight of the rider.
Half of a pony clamp (above left) that will slide up but not down unless the brake tabs are depressed.
- a 1/2 inch black (un-galvanized) water pipe, anchored on both ends to the wall & floor.
Right is a drawing for the outdoor lift brake. It uses a 5/16 inch rod u-bolt that passes through holes drilled in angle iron, the angle iron presses on the brake tabs. The u-bolt rod supports the weight of the rider, there's no separate brake wire. (drawing should show nylon lock nuts, tisk!)The brake tabs are four rings and a spring that binds their edges against the pipe like teeth, locking it in place till the tabs are pushed. The weight of the elevator cart/chair/platform is enough to keep the tabs pressed so the lift slides up and down freely, but if the hoist cable breaks, the tabs are released, locking the platform to the pipe.
I haven't tested any clamps to destruction but I've used them to make furniture, tightened them till the pipe bowed and never had one slip, they should at least hold more than the winch can lift (400 lbs). The brake pipe on a vertical lift in my house doesn't bow even when I jump on it. If you're still wary, use more or bigger pipes and clamps, or both. To be sure, if you plan for a lift big enough for several people, you should get a bigger winch, heavier cable, and maybe several brakes. Multiple brakes can be "tuned" so they all release and engage at the same time, with a seperate turnbuckle connected to each brake wire. To be on the safe side, the pony clamps all depend on an internal spring to engage the locking rings. That spring should probably be checked every few years if the lift is someplace where things rust (like in coastal redwoods or something).
Commercial iron water pipes are 1/8 inch bigger inside than their rated size so a 1/2 inch pipe is actually closer to 5/8. Add to that 1/8 inch thickness of the pipe so the outside is around 7/8 dia. Pony clamps are made to fit black iron pipe, not galvanized pipe. I tried 3/4 inch clamp once but it bound up and wouldn't slide predictably. That may have been a fluke, but I knew 1/2 inch pipe would work so I didn't pursue it.
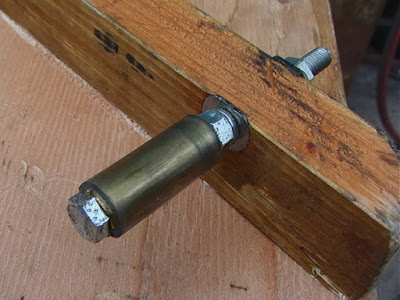
Below is the back of Erifs wood rail outdoor lift showing the brake. It presses against a piece of 1/4 thick angle iron with a 3 inch leg which is bolted to the chair frame. The bolt heads between the bottom rollers (lower right pic) are the ends of roller guides that look like this below on the left (this one is actually on the upper rail) it's made of a 3/8 bolt and a 1/4 inch brass pipe nipple for a roller (inside diameter is 3/8" because manufacturers add 1/8"), way cheaper than buying brass bushings. I slid on an extra "tire" of a piece of 5/8 vinyl tube but they fall off. There's no roller on the back of the lower rail to keep the chair from falling off because all the weight of the chair & rider is pushing from the other side and they also hook over the top rail. Even rollers maybe unnecessary in this case because a piece of waxed tin flashing glued to the wearing surface of the chair will slide as well if the ends are curved around the end of the frame so their edges don't catch on the 2x4

2 inch cast iron casters $4.25 Amazon, support 125 lbs each. 2+ required
1/2 inch pipe pony clamp $15 Amazon
Electrical Wiring
It's possible to just use the hand held control switch that comes with the winch but it's electric cord could be a problem when the lift follows a stair at an angle. On the outdoor lift there's plenty of room behind the rails, but the indoor lift has a wall. This wiring diagram is for a remote that hangs on the lift chair back and controls the lift like a garage door remote. It only uses 2 out of four channels but it was the only kind I could find when I made it, so there's 2 extra for something, like upstairs / downstairs lights. Of the 2 channels used, one turns the motor on or off in case of some emergency, and the other button reverses direction. If you're into electronic circuits, you can probably think of a better way.
There is a built in switch on the winch that stops when the load reaches the top. I added another limiting switch to turn it off when it reaches the bottom. (diagram lower left)
The green items in the lower right are a 4 pin automotive relay from auto parts store or amazon search, around $4 - $9, they can be around 5 amps, but 40 won't hurt, and some kind of momentary switch to energize it. This thingie was added later because during storms when the power cuts off and then on again, the elevator springs to life with no warning, sometimes in the middle of the night. So the green items turns it off when the power is cut till you push the reset button the next morning, thus preventing any heart attacks. A drawback is that this always draws a couple of watts of power when it's not being used. So maybe choose one with a low static draw.
the DPDT relay replaces the handheld control switch that comes with the winch. Just pull the wires off the the native switch terminals and plug them on the corresponding terminals on the relay, same setup.
These are 2022 prices from Amazon.com. Also probably available from RadioShack.com, NewEgg.com and others.
12v automotive relay: $5, 1.8 watts standby
Momentary switch: $5, Radio Shack
12v relay SPST: $15, Newegg
12v relay DPDT: $12
Lower limiting switch: $12
4 channel 433 Mhz RF remote control wireless receiver/transmitter: $19
12v lighting power supply: $15, 60 watts.
Potential Problems
These are some glitches that have cropped up, please don't let them put you off (there's probably more someplace). If you make this lift for someone who isn't handy themselves, plan to be available for the next several months to iron out any problems till everyone gets the hang of it. This was an affordable solution for a friend who thought she'd have to move out of her home because of stairs and osteoporosis. She has a class K residence (treehouse) and local housing is insanely expensive, it'll be good for a number of years but there are no permanent solutions to anything.
- When the lift/chair reaches the bottom, and for any reason the motor doesn't shut off, it will continue to spool out cable and make loops on the floor or wherever. Then when the cable is retracted without tension, the loops will tangle around the spool causing kinks and knots that hamper easy functioning in several ways that require pulling the cable out by hand and re-winding it under light tension. That's a group that all have the same cause, so plan ahead*.
- *Put a good limiting switch at the bottom that actuates against the chair/lift, with access and plenty of space to function.
- Don't shorten the cable even though it's 5x longer than you need. Extra length might come in handy if the cable kinks and its wires start to crack. If the cable is shortened to the exact length, it'll begin to rewind when it reaches the bottom but the built-in shutoff switch at the top won't turn the motor off because the up-circuit and down-circuit are separate and it'll still think it's running downhill, so by winding up backwards it'll crunch the chair at the top and then overload. It will stop though (whew!). The hand held control switch that comes with the winch has a Kill button if the other switch buttons are un-responsive.
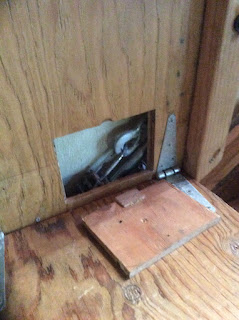
Design it with room for access to the various components. The indoor lift I made to fold up against the wall has barely room for a finger behind it much less a wrench. That's bad, there should be at least a couple of inches clearance to access wheels, switches, etc. I put a little door in the back of the seat to clean the brake, but first I had to take the whole chair, brake and brake pipe off several times to figure out simple stopping problems.
- It was stopping erratically because the brake vibrated (mounted crooked but fixed with a roller that applys pressure on the pipe)
- Stopping because the pipe collected dust and dog hair that clogged up in the pony clamp brake, grease on the pipe is messy and attracts crud so Erif uses a spray can of dry lubricant (required a piece of a sock on a wire "wiper" to keep the pipe clean)
- Stopping because the wall and brake pipe were both crooked and the pipe would rotate with use, pushing the pony clamp to rub against the wall (glued the upper housing of the pipe with "Goop" to hold it steady).
- Stopping because the rollers need grease. The wheels and guide rollers definitely do need oil or grease, or they'll squeak and cause the chair to lurch.
- Plan for a contingency to get downstairs when the power goes off. Stairs work great but the vertical lift in my house is supposed to replace stairs because it's a small house (smaller than an M1 Abrams footprint). Stairs take up floor space, but sometimes the power goes out for days. So the lift platform folds up like a trapdoor and there are parkour handholds on the wall for climbing. Pretty cool eh? (till I turn 80) I've used it several times already, and it's slightly easier than climbing out a window, and needs more thinking. Something like a rope or telescoping ladder/firehouse pole.
Here's a nice youtube lift design on a similar idea, but has no brake.
This webpage is copyrighted Bill Cornelius 2022
but the elevator/lift design is not, so go crazy.
Just link :)
Something else besides religion, but not exclusively. There's probably more written justifying gods existence than anyone could read in a lifetime. Most of it is politically driven medieval propaganda based on prehistoric myth. But since God's ultimately a personal matter, anyone can hold god up for scrutiny, so I'm as much an authority as the next person. This is my Notebook.